Output Image Path
The Output Image Path node specifies where an image should be saved, the name to use and all the file format information. Currently it is the only output path for a bake. It takes color or value data from one or more Pass nodes as input. Each input is written to the final image in the order they appear, such that if you used the Color input and the R input (assuming none of the input data had Masks assigned) the R input would override every Red value of the Color input. Writing to the A (Alpha) channel requires an image format that supports alpha to be chosen or it will be ignored. Writing alpha also takes slightly longer and is performed in a separate pass once colors are written. An output is provided for linking to one or more Batch Bake nodes if desired.
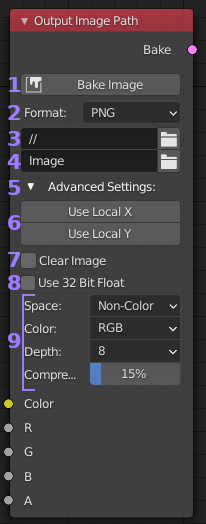
- Bake Image Button: After validating settings this will cause all
connected passes to be performed, mixed together and
saved to the output file. This is the primary method for starting a
non-batch bake. For the differences with the similar Bake Pass button
take a look at the Bake Pass vs Image example.
- Format: Drop down list of supported image formats. This will default
to the output format selected for your current scene when placing the node.
The options in section [7] will change depending on the format chosen.
- Image Path: Simply used to select the path where the image will be
saved. Relative paths may be used (eg. // to refer to the path the .blend
file is in).
- Image Name: The name of the image with or without the extension. The
extension will be added for the currently selected file format unless you
have given the file an extension that isn’t recognized (eg. if format was
set to ‘JPEG’ both ‘img’ and ‘img.png’ would be saved as ‘img.jpg’ but
‘img.myext’ would not be changed).
- Advanced Settings: Collapses or expands the more advanced or less
used settings to reduce clutter and node footprint.
- Local X and Y Resolution: These are used only to override any Resolutions
nodes or when no global values are set or active.
- Clear Image: When enabled and if the target image already exists, it
will clear the image to black (and transparent if supported by image settings)
before writing bake data.
- Use 32 Bit Float: Normally blender renders images using 8bits per channel
per pixel (24bpp or 32bpp with Alpha). If you want to save your output in a
format with more data per pixel than that you need to enable this option. All
contributing passes will then use 92bpp (128bpp with Alpha).
This uses up 4x more memory than standard, but can be useful for data maps
(eg. normals) to allow more variations in color (and hence a more accurate
representation of the data). For plain color maps it generally doesn’t provide
any advantages. You must also use an image format and bit depth with higher than
8bpp or the extra data will be lost and colors may appear different than expected
as they are remapped to a lower bit depth.
- Format Options: This group of options are specific to the chosen image format and will change accordingly. Almost all formats support ‘Color Space’, if you are unsure what to pick use ‘sRGB’ for color information and ‘Non-Color’ for data maps like normals. For any other settings either use the defaults or check the tool-tip for more information if you are unsure.