Pass
The Pass node is where the type of bake (pass) is selected and all rendering options are set. It can take any number of Mesh nodes as input (adding inputs will cause it to keep expanding to accept more). The outputs expose the combined Color and Value of pixels as well as the individual Red, Green and Blue values. Outputs can be connected in any combination to any number of Output Image Path nodes.
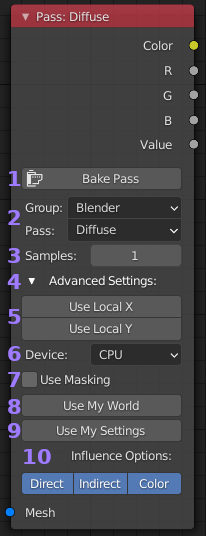
- Bake Pass Button: Will validate settings and then bake this
nodes pass. Any linked outputs will be updated, but only the
specific linked channels. See the Bake Pass vs Image example for
how this works.
- Group & Pass: Drop down list to select bake pass. Some passes may
have additional options which will appear below when selected.
Tool-tips are used to explain their functions. Additionally some
passes require a Principled BDSF based material on the objects,
the tool-tip on the pass should list any requirements.
- Samples: This is the number of samples taken for each pixel in the
bake. For most passes (any PBR map, normals, etc) one sample is
sufficient. When lighting information is needed (eg. AO pass) more
samples will be needed to produce a good result. If in doubt start with
one sample and increase if the result isn’t good enough.
- Advanced Settings: Collapses or expands the more advanced or less
used settings to reduce clutter and node footprint.
- Local X and Y Resolution: These are used only to override any Resolutions
nodes or when no global values are set or active.
- Device: Simple choice between CPU or GPU as rendering device.
When the node is places this will default to your scenes currently
selected device. While not usually an issue when baking, if a render
exceeds the available memory of your GPU it will fail. This isn’t
the case for CPU making it the safe option.
- Use Masking: Enabling this option will create a second image of the
same size, where white pixels (1s) map to the UV islands of the bake
and black pixels (0s) map to pixels that aren’t part of an island. This
map will automatically be used when writing to the final output to leave
unmasked pixels unchanged. While many bakes don’t require this, it allows
for much greater flexibility in layering passes and objects into a single
final image. The time taken to generate the mask is negligible, take a look
at the Masking for an example.
- Use My World: If you want to use lighting information from your scenes world
in the pass, you need to enable this option and select the ‘World’ you want
to use (if left blank, but enabled the currently active scenes world is used).
By default Bake Wrangler uses a plain 100% white world background.
- Use My Settings: Enabling this causes Bake Wranglers default rendering settings
to be replaced with the settings from the ‘Scene’ you select (if left blank, but
enabled the currently active scenes settings are used). The default render settings
used by Bake Wrangler are optimized to quickly render maps without lighting information
and complex data like hairs and caustics. If you need to bake lights, hairs or rays
that are changed by passing through objects (glass, fog, etc) then you will need to
use this setting with appropriate Cycles values set in your scene. For any PBR maps
and most data maps this should be disabled for best performance.
- Additional Pass Settings: If the selected pass has additional options they are displayed here. Use the tool-tips to see what they do, or if in doubt leave at default.