Mesh Settings
The Mesh Settings node controls Input Mesh nodes and can be pinned to apply to all such nodes that have an empty ‘Settings’ socket. Only one node can be pinned at a time to apply in this way.
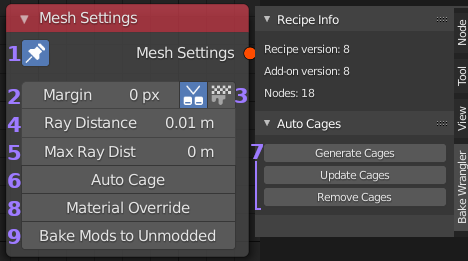
- Pin: When pinned this nodes settings will be applied to all
Input Mesh nodes with an empty ‘Settings’ socket in the
current recipe. Only one Mesh Settings node can be pinned at
any time and the previously pinned node will become unpinned if
another is pinned.
- Margin: Number of pixels to extend out around the edges of
baked UV islands. This is used to prevent bleeding of background
colors into texture island edges when a coordinate lies on a pixel
boundary or when a texture is re-sampled at a different resolution.
- Marginer Options: You can choose to use the alternative margin
generator by using the toggle button. When enabled there is also a
fill option that can be enabled to fill all empty space with margin
instead of using a set pixel amount. The alternative method is much
slower, adding an average of 20 seconds to the time it takes to produce
the final image. However it will not overlap the UV islands of other
objects when using an atlas of multiple objects with a single UV map.
It solves problems the default much faster margin generator can cause.
- Ray Distance: Sets the distance in blender units that baking rays
should be cast from above the objects surface. This only applies when
baking from one or more Source objects. It needs to be far enough
away to hit any details that extend above the surface of the Target.
When finer control is required a cage object should be specified on
the Target object.
- Max Ray Distance: Limits how far a bake ray can travel to hit a surface
after which it will be ignored.
- Auto Cage: This will create a cage for every target object that doesn’t
have it’s own cage specified. When enabled an expansion and smoothing angle
value will appear. The expansion value determines how far out (or in with a
negative value) the cage will be created from the original object. The smoothing
angle is the angle below which normals will be smoothed. Complicated objects
may not result in a good cage and small values for expansion should be used.
- Cage Generation Buttons: In the side (‘N’) panel on the Bake Wrangler tab
are three buttons that interface with the ‘Auto Cage’ setting. The ‘Generate’
button will create and display cages using the active cage settings for objects
in the current scene that are found in the current recipe. These cages can then
be edited and will be used automatically when baking. A modifier is used on the
cage objects, which will be updated to reflect any changes in the ‘Auto Cage’
settings when the ‘Update’ button is pressed. Note that if you removed the
modifier and edited the cage, your changes will be lost if you press this button
(Hide objects you don’t want changed and shift-click the buttons in that case).
Use the ‘Remove’ button to delete any generated cages. The idea of these buttons
is to allow for easy visualization of what the ‘Auto Cage’ will look like and
also for easy editing of the cage.
- Material Override: This will replace all materials on your objects with
the selected material during baking. Use this to either bake alternative
materials without modifying your scene or to bake your own material based
passes (such as OSL shaders).
- Bake Modifiers to Unmodified: This can be used to bake the effect of a modifier onto the base object. Mainly this is for convenience and achieves the same result as duplicating an object, stripping the modifiers you wanted to bake and then baking the original object onto the stripped version. This can be useful to bake a bevel modifier for example. It is also possible to exclude modifiers by disabling their viewport visibility (this behavior can be inverted in the preferences). If for example you had a mirror modifier followed by a bevel you would hide the mirror (it will now get applied to both objects before baking) and leave the bevel visible so that only the difference created by the bevel would be baked.