Pass Settings
The Pass Settings node controls Bake Pass nodes and can be pinned to apply to all such nodes that have an empty ‘Settings’ socket. Only one node can be pinned at a time to apply in this way.
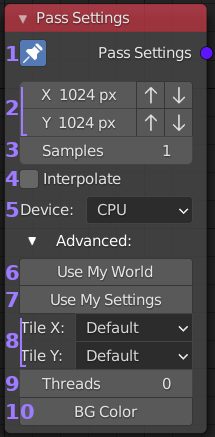
- Pin: When pinned this nodes settings will be applied to all
Bake Pass nodes with an empty ‘Settings’ socket in the
current recipe. Only one Pass Settings node can be pinned at
any time and the previously pinned node will become unpinned if
another is pinned.
- Resolution: The X (width) and Y (height) to bake the data.
Up and down arrows to the right increment the size in powers of
two for convenience.
- Samples: This is the number of samples taken for each pixel in the
bake. For most passes (any PBR map, normals, etc) one sample is
sufficient. When lighting information is needed (eg. AO pass) more
samples will be needed to produce a good result. If in doubt start with
one sample and increase if the result isn’t good enough.
- Interpolate: When enabled each pixel from the bake data will be interpolated
when written to the output. This is mostly useful when your bake and output are
different sizes. Edges will gain a very soft anti-aliased look.
- Device: Simple choice between CPU or GPU as rendering device.
Your GPU must be properly configured in Blenders settings and supported.
If you don’t get the expected results try changing settings (eg. switch from
Optix to CUDA) or try using CPU instead.
- Use My World: If you want to use lighting information from your scenes world
in the pass, you need to enable this option and select the ‘World’ you want
to use (if left blank, but enabled the currently active scenes world is used).
By default Bake Wrangler uses a world that contributes no light.
- Use My Settings: Enabling this causes Bake Wranglers default rendering settings
to be replaced with the settings from the ‘Scene’ you select (if left blank, but
enabled the currently active scenes settings are used). The default render settings
used by Bake Wrangler are optimized to quickly render maps without lighting information
and complex data like hairs and caustics. If you need to bake lights, hairs or rays
that are changed by passing through objects (glass, fog, etc) then you will need to
use this setting with appropriate Cycles values set in your scene. For any PBR maps
and most data maps this should be disabled for best performance.
- Tile Size: Sets the X and Y render tile size. Essentially this breaks your pass
into smaller tiles that can be processed in parallel. The default settings are quite
good for most cases, however the tile to image size setting can be faster for GPU
passes without lighting.
- Threads: Number of render threads. Set to zero for automatic (which will be one for
each core in your system).
- Background Color: The default is black. This is the color that will appear in the gaps between UV islands. It is also possible to set this on the Bake Pass directly if you wish to only change one particular pass.