Output Settings
The Output Settings node controls Output Image Path nodes and can be pinned to apply to all such nodes that have an empty ‘Settings’ socket. Only one node can be pinned at a time to apply in this way.
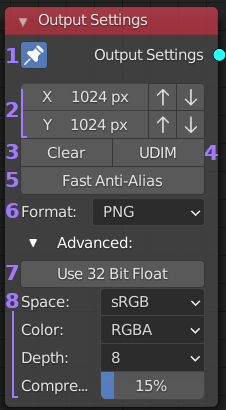
- Pin: When pinned this nodes settings will be applied to all
Output Image Path nodes with an empty ‘Settings’ socket in the
current recipe. Only one Output Settings node can be pinned at
any time and the previously pinned node will become unpinned if
another is pinned.
- Resolution: The X (width) and Y (height) to output the data.
Up and down arrows to the right increment the size in powers of
two for convenience. Using a higher bake size than output size
allows for down sampling.
- Clear: When enabled and if the target image already exists, it
will clear the image to black (and transparent if supported by image settings)
before writing bake data.
- UDIM: Assumes UV maps follow the UDIM format and will output tiles
based on their UV location. Each tile will have their number appended
to the file name. The result for tiles outside of the UDIM range is
undefined. A UV space with no tiles will result in a single tile output.
- UDIM: Assumes UV maps follow the UDIM format and will output tiles
based on their UV location. Each tile will have their number appended
to the file name. The result for tiles outside of the UDIM range is
undefined. A UV space with no tiles will result in a single tile output.
- Format: Drop down list of supported image formats. This will default
to the output format selected for your current scene when placing the node.
The options in section [8] will change depending on the format chosen.
- Use 32 Bit Float: Normally blender renders images using 8bits per channel
per pixel (24bpp or 32bpp with Alpha). If you want to save your output in a
format with more data per pixel than that you need to enable this option. All
contributing Bake Pass will then use 92bpp (128bpp with Alpha).
This uses up 4x more memory than standard, but can be useful for data maps
(eg. normals) to allow more variations in color (and hence a more accurate
representation of the data). For plain color maps it generally doesn’t provide
any advantages. You must also use an image format and bit depth with higher than
8bpp or the extra data will be lost and colors may appear different than expected
as they are remapped to a lower bit depth.
- Format Options: This group of options are specific to the chosen image format and will change accordingly. Almost all formats support ‘Color Space’, if you are unsure what to pick use ‘sRGB’ for color information and ‘Non-Color’ for data maps like normals. For any other settings either use the defaults or check the tool-tip for more information if you are unsure.